Mantle Network Airdrop Guide
Step by Step Guide to Secure an Airdrop

Links & Resources
Website: https://www.mantle.xyz/
About: https://docs.mantle.xyz/network/introducing-mantle/a-gentle-introduction
Faucet: https://faucet.testnet.mantle.xyz/
Bridge: https://bridge.testnet.mantle.xyz/
Discord: https://discord.com/invite/0xMantle
Twitter: https://twitter.com/0xMantle
Telegram: https://t.me/mantlenetwork
GuildXYZ: https://guild.xyz/mantle
Zealy: https://zealy.io/c/mantle/invite/hOHA_FLjVcX18Krdt8Zrw
Mirror: https://mirror.xyz/0xMantle.eth
This article contains some affiliate links which may earn us a commission at no additional cost to you.
Step By Step Guide
Airdrop: Unconfirmed but expected
Stage: Testnet
Investment Required: $5-10 USD
Complexity: 3/5
Time: Allow 30-45 minutes to complete actions first time. Repeat testnet actions 3-4 times per week, allowing 10 minutes to complete the actions. Do Zealy quests daily or weekly depending on their frequency and to check for new available quests when launched.
Join Socials
Join Discord (recommended) for project updates and discussion, e.g. troubleshooting the Blast Off campaign with other server members.
Follow Twitter (not compulsory) for project updates.
Join Telegram (not compulsory) for project updates.
Join Guild (recommended) for Discord roles — this requires you have an Ethereum wallet to link (no transaction required, just signing to show it’s your wallet) and a Discord profile to link (at the least). Once you link your wallet click on Join Guild To Get Rewards then Join. You will get roles in the Discord server when you meet the criteria required for each role.
Follow on Zealy to complete their quests and gain experience points.
Subscribe on Mirror (when a new article is released you can mint the article as an NFT for a small gas fee although this is limited to the first 500 people)
This guide assumes the following
You have MetaMask installed and have setup a wallet
You have funded your wallet (with ETH or a stablecoin such as USDT that you can convert to ETH using the Swap function in MetaMask)
You understand how to use MetaMask
You understand the difference between signatures and transaction approvals in MetaMask
You understand gas fees
You understand how to swap and bridge tokens to different blockchains
You have installed some or all of the extensions from our article to keep you safe while you carry out your airdrop farming activities
If any of the above assumptions are confusing, please do more research and familiarise with these concepts before you continue with ANY airdrop farming activities.
Add Goerli and Mantle testnet Networks to MetaMask
Add Mantle test network to your MetaMask wallet from here https://chainlist.org/chain/5001
Click Connect Wallet
Approve the signature request to connect your wallet in MetaMask pop up
Click Add to MetaMask

Approve signature request in MetaMask pop up
Add Goerli test network to your MetaMask wallet from here https://chainlist.org/chain/5
Click Add to MetMask
Approve signature request in MetaMask pop up

Get gETH tokens on Goerli testnet
If you already have enough gETH on Goerli then you can skip this step.
Option 1 - bridge ETH from ETH mainnet to gETH on Goerli testnet
You will require ETH on mainnet to do this - some for bridging and some for the gas fee
Aim to do this when gas prices are at their lowest - install Blocknative browser extension and pin it to see current network gwei level
Head to https://testnetbridge.com/
Click connect wallet at the top right of your screen
Approve the signature request to connect your wallet in MetaMask pop up
Choose the Ethereum network in your wallet
Choose ETH on Ethereum in token dropdown

Input a tiny amount of ETH to bridge, e.g. 0.0005 ETH - you will see this translates to a very large sum of gETH on Goerli testnet
Click Transfer
Confirm transaction request in MetaMask pop up
Your gETH funds should arrive on Goerli testnet shortly
You should only need to do this once and then you will have enough gETH for months of activity if not more

Option 2 - Use gETH faucets to drip GETH to your wallet on Goerli testnet
Goerli Faucet
Drips 0.02 gETH to your wallet
Create an account first
Go back to the faucet page
Paste your ETH wallet address in the box
Complete Captcha to prove you’re human
Click Send Me ETH
Your gETH funds should arrive on Goerli testnet shortly
Note, to prevent bots and abuse, the Goerli faucet requires a minimum mainnet balance of 0.001 ETH on the wallet address being used
You can only claim once every 24 hours


Paradigm Faucet
Drips 0.1 gETH to your wallet
Click on sign in with Twitter

Approve the authorisation notification from Twitter to connect your Twitter account
Paste your ETH wallet address in the box
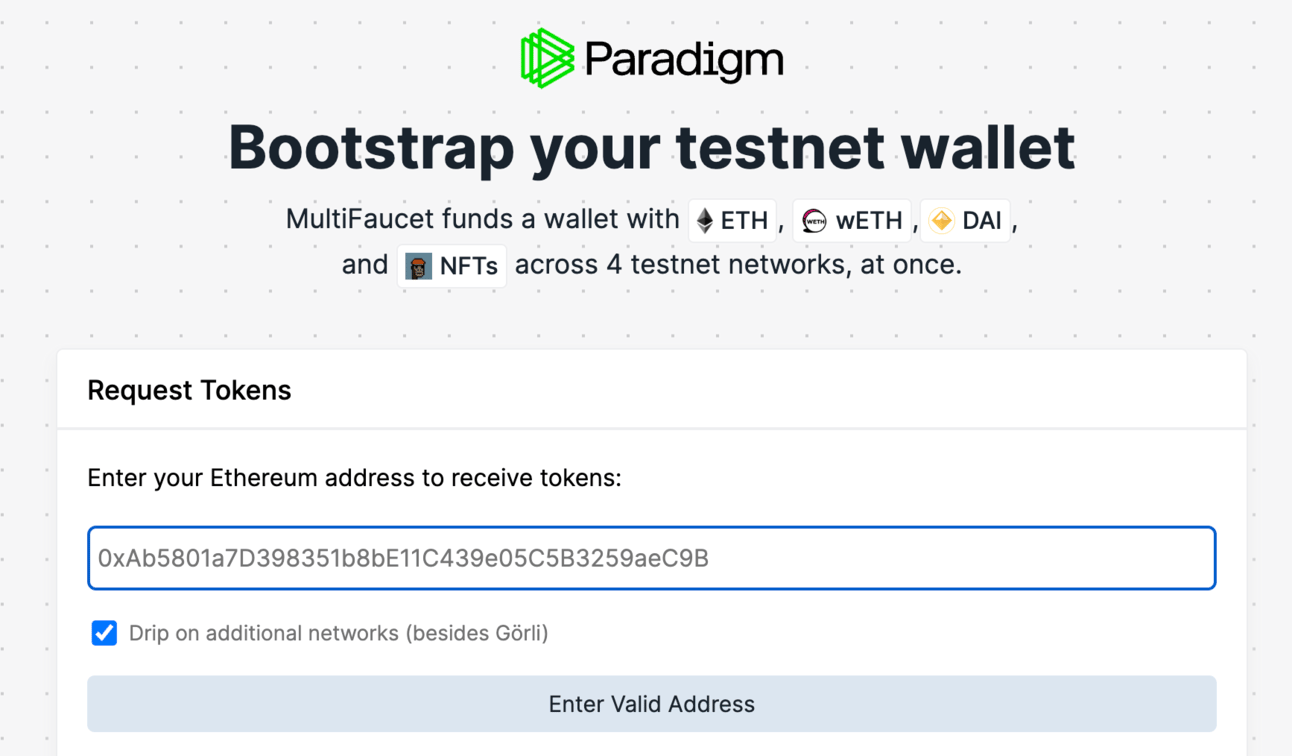
Click Claim
Your gETH funds should arrive on Goerli testnet shortly
Note, your Twitter account must have at least 1 Tweet, 50 followers, and be older than 1 month.
You can only claim once every 24 hours


Quicknode Faucet
Drips 0.05 gETH to your wallet (or 0.01 gETH if you share a Tweet)

Click Connect Wallet
Choose Connect MetaMask
Approve the signature request to connect your wallet in MetaMask pop up
Choose Select Network and select Goerli
Click Continue
If you want to double your claim to 0.1 gETH you can click Generate the tweet for me and I'll share!

A new tab will open Twitter with a pre-filled Tweet to post
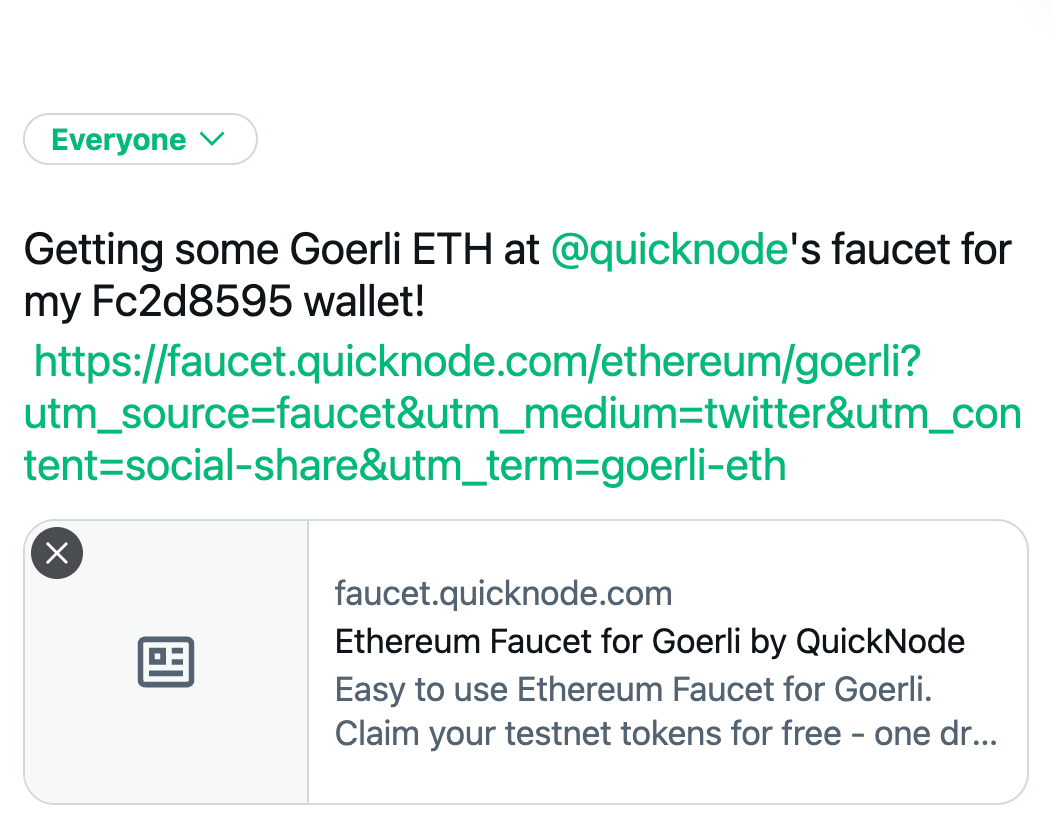
Click Tweet
Go into your Tweet and copy the URL from your browser bar
Close Twitter tab
Paste the URL into the Tweet URL box on the faucet page
Click Claim my 0.1 ETH
If you don’t care about about doubling your claim ignore previous steps and click No thanks, just send me 0.05 ETH
Your gETH funds should arrive on Goerli testnet shortly
Note, to prevent bots and abuse, the Goerli faucet requires a minimum mainnet balance of 0.001 ETH on the wallet address being used
You can only claim once every 24 hours


Option 3 - Use all of the above to maximise your gETH balance on Goerli.
Note that some Zealy quests for various airdrop require proof of gETH claims on Goerli so make sure you do this at least once.
Get testnet MNT tokens on Mantle
You can combine all these options to maximise the amount of testnet MNT you receive. It’s recommended to do this once per day.
Option 1 - via the offical faucet

Click Authenticate to authenticate your Twitter account
Click Connect Wallet to connect your MetaMask wallet
Approve the signature request to connect your wallet in MetaMask pop up
Switch to Goerli testnet in MetaMask
Keep Mint address the same (unless you want to send the tokens to a different wallet address in which case paste the address)
Update Mint token amount to 1000 or the maximum it tells you that you can mint (you can mint up to 1000 every 4 hours)
Click Mint tokens
Confirm transaction request in MetaMask pop up
Your MNT tokens should arrive on Goerli testnet shortly
Note you can only hold a balance of 1000 MNT tokens in your wallet on Goerli tesntnet at anytime so you will need to bridge these tokens to the Mantle testnet before you can mint more MNT tokens. The faucet will warn you of this and you won’t be able to carry out the mint transaction until your wallet is empty of MNT. Bridging MNT from Goerli to Mantle testnet is a weekly task on Mantle’s Zealy questboard.

Option 2 - via the official Discord faucet channel
You will need to be a verified member of the Discord to access this.
Type: $faucet [INSERT YOUR WALLET ADDRESS]
Please replace the text in the brackets with your wallet address and do not include the brackets
Press enter
Your MNT tokens should arrive on Goerli testnet shortly
You can only claim once every 24 hours
This ignores the 1000 MNT wallet limit from Option 1
Option 3 - via FusionX
Head to https://fusionx.finance/faucet
Click Connect Wallet top right
Choose MetaMask
Follow MetaMask prompt to switch to Mantle testnet if you’re not already on that network
Click Send Tweet
A new tab will open Twitter with a pre-filled Tweet to post
Click Tweet
Close Twitter tab
Click Verify Tweet and the page will reload to a Twitter authorisation page
Click Authorise and the page will reload to the faucet page
Keep Get Tokens address the same (unless you want to send the tokens to a different wallet address in which case paste the address)
Complete Captcha to prove you’re human
Click Get Tokens
Click Okay
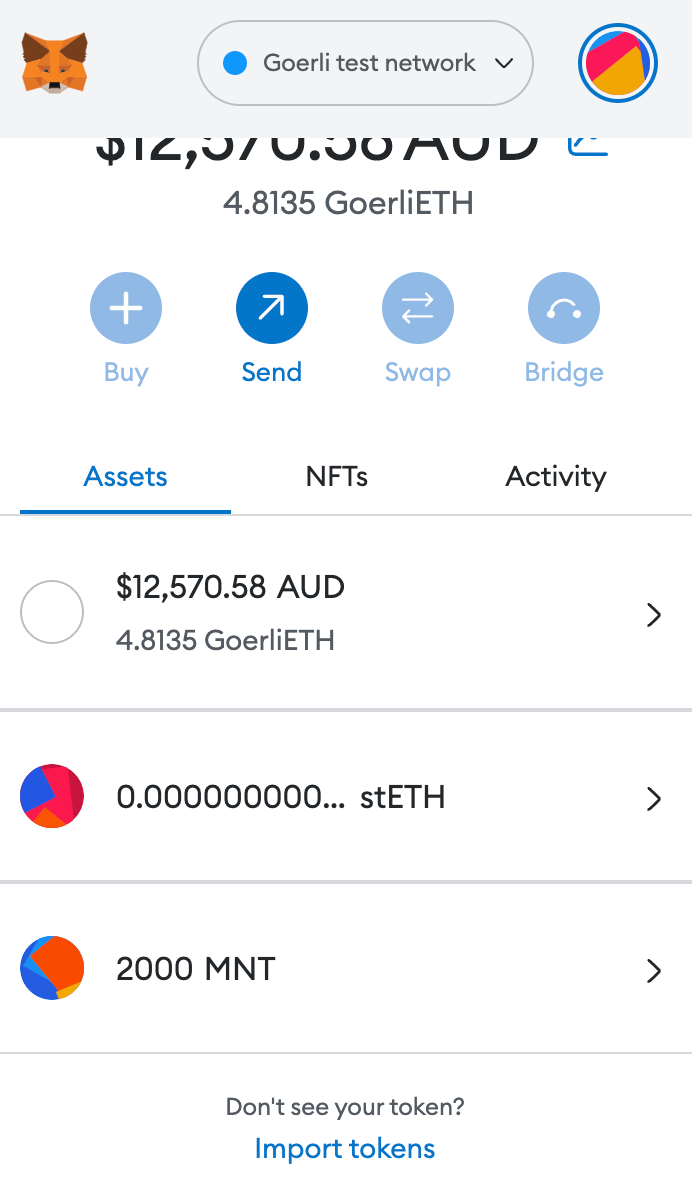
Import the MNT token to your MetaMask asset list
Open MetaMask extension
Switch to Goerli testnet in MetaMask
Click on Assets
Scroll down and choose Import Tokens
Paste the MNT contract address: 0xc1dC2d65A2243c22344E725677A3E3BEBD26E604
Wait for the details to populate
Click Add custom token
You will now be able to see your MNT balance under your asset list

Testnet Actions
Bridge MNT from Goerli testnet to Mantle testnet
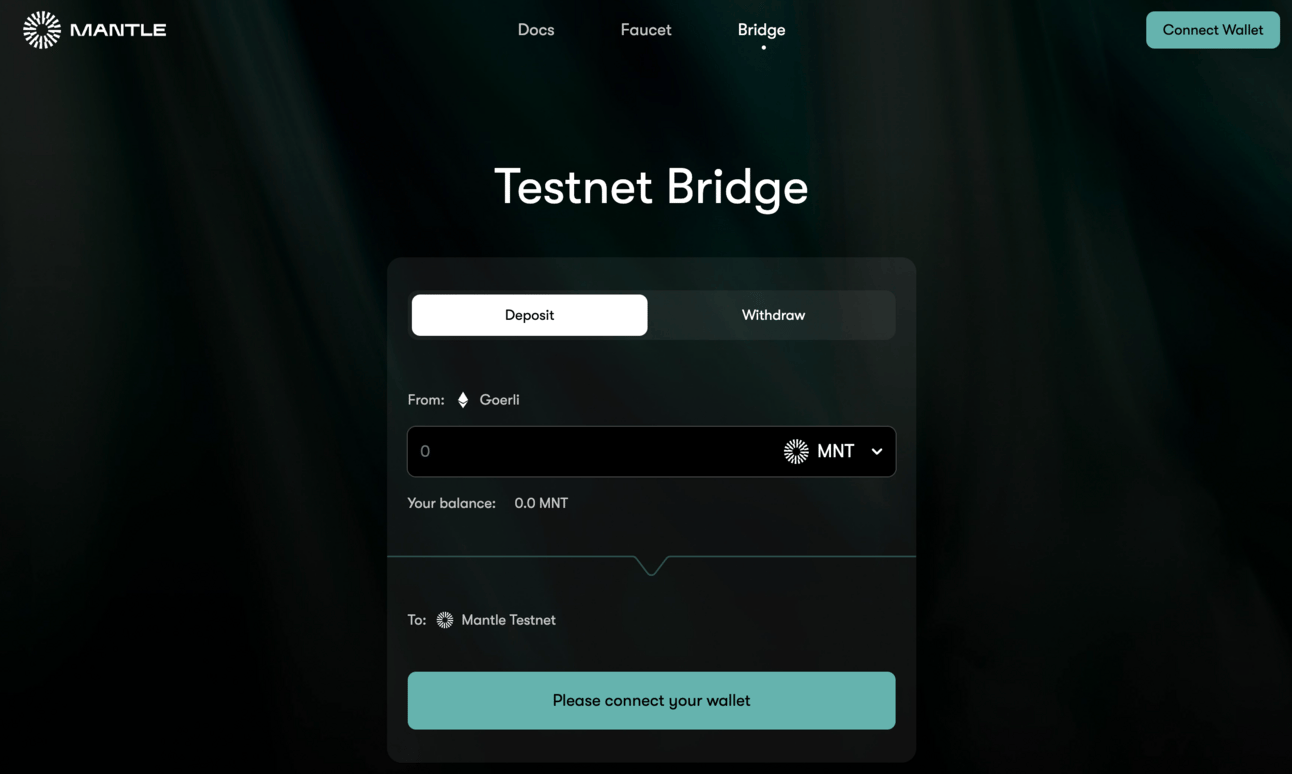
Click Connect wallet top right
Switch to Goerli testnet if prompted

Choose Deposit
Type in 1000 or your total balance of MNT in the input box (a message will show you your total MNT balance below the input box)
Click Allocate allowance before depositing assets
In the MetaMask pop up click Max then Next
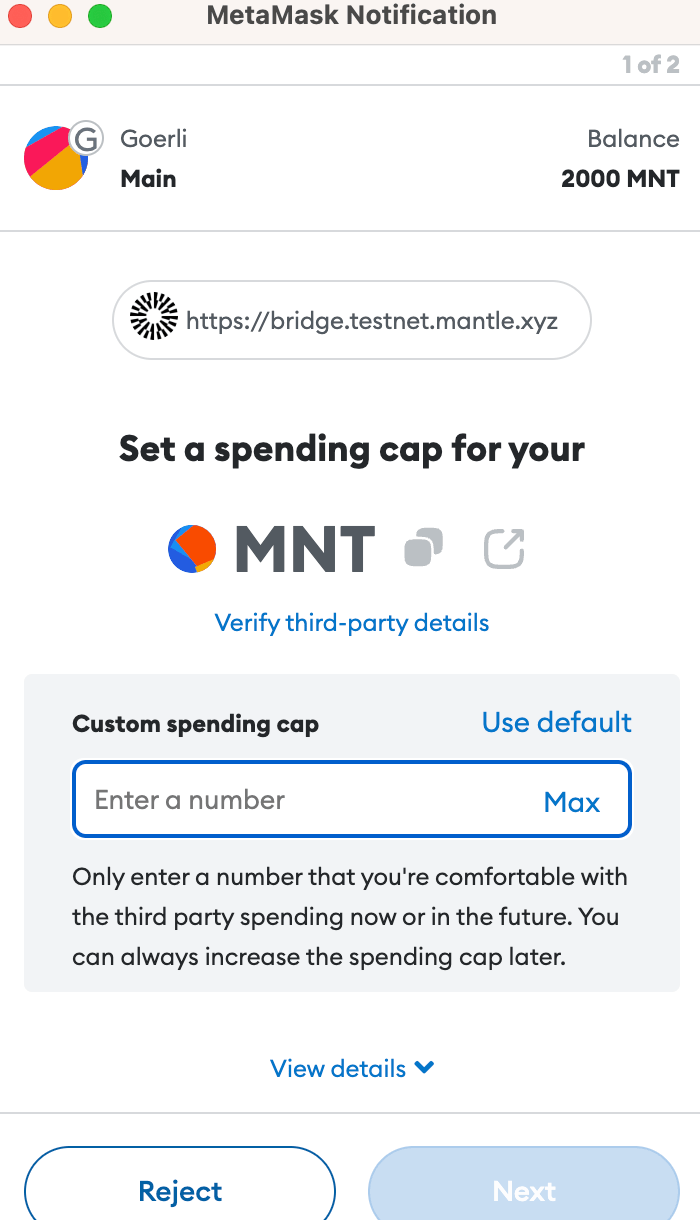
Approve transaction request in MetaMask pop up
A small glitch might mean you need to repeat this process
Once approved, click Deposit Tokens to L2
Click Confirm
Confirm transaction request in MetaMask pop up
Your MNT tokens should arrive on Mantle testnet within 10 minutes


Withdraw MNT from Mantle testnet to Goerli testnet
Click Connect wallet top right
Switch to Mantle testnet if prompted
Choose Withdraw
Type in 1 or any amount of your balance of MNT in the input box (a message will show you your total MNT balance below the input box)
Click Withdraw Tokens from L2
Check the two checkboxes
Click Confirm
Confirm transaction request in MetaMask pop up
Your MNT tokens should arrive on Goerli testnet within 20 minutes
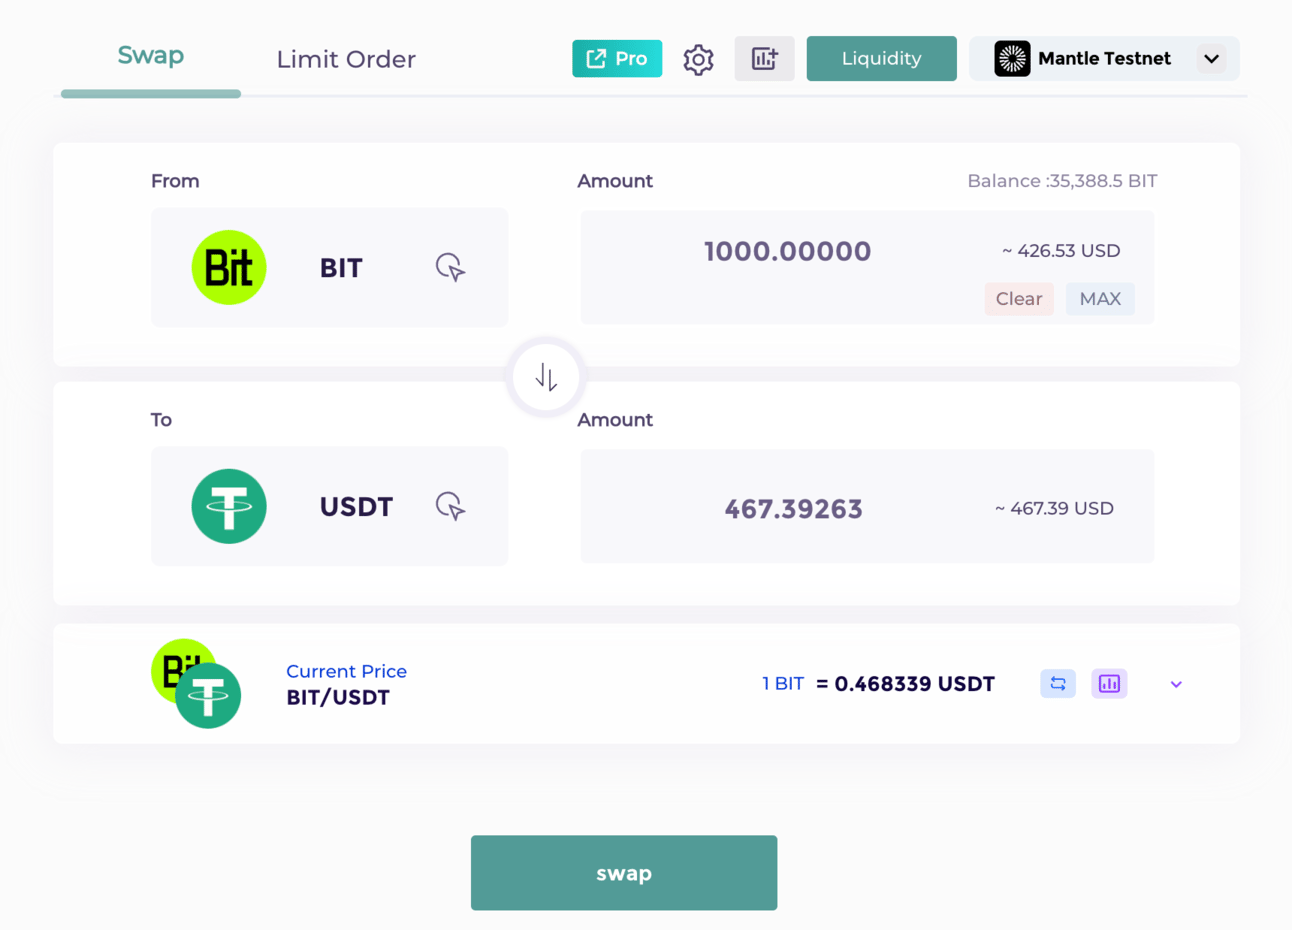
Complete actions on Mantleswap
Swap MNT to USDT
Click Connect wallet top right
Switch to Mantle testnet if prompted
Choose Swap
Choose MNT from the first token dropdown box
Note, it may show up as BIT token which was the token code they used in an earlier version of the testnet
Choose USDT from the second token dropdown box
Type in any amount of your balance of MNT in the input box (you will be able to see your balance on the right)

Click Swap
Click Confirm Swap
Confirm transaction request in MetaMask pop up
Click Add USDT to MetaMask

Click Add token
Your USDT tokens should appear in MetaMask under Assets shortly


Add Liquidity
Click Connect wallet top right
Switch to Mantle testnet if prompted
Choose Liquidity
Choose Add Liquidity
Choose MNT from the first token dropdown box
Note, it may show up as BIT token which was the token code they used in an earlier version of the testnet
Choose USDT from the second token dropdown box
Click Max next to USDT amount

Click Approve USDT
In the MetaMask pop up click Max then Next
Approve transaction request in MetaMask pop up
Click Confirm Adding Liquidity
Click Confirm Deposit
Confirm transaction request in MetaMask pop up
Click Add USDT to MetaMask
Click Add token
Your USDT tokens should appear in MetaMask under Assets shortly

Complete actions on Zonic
Purchase an NFT
Head to https://testnet.zonic.app/
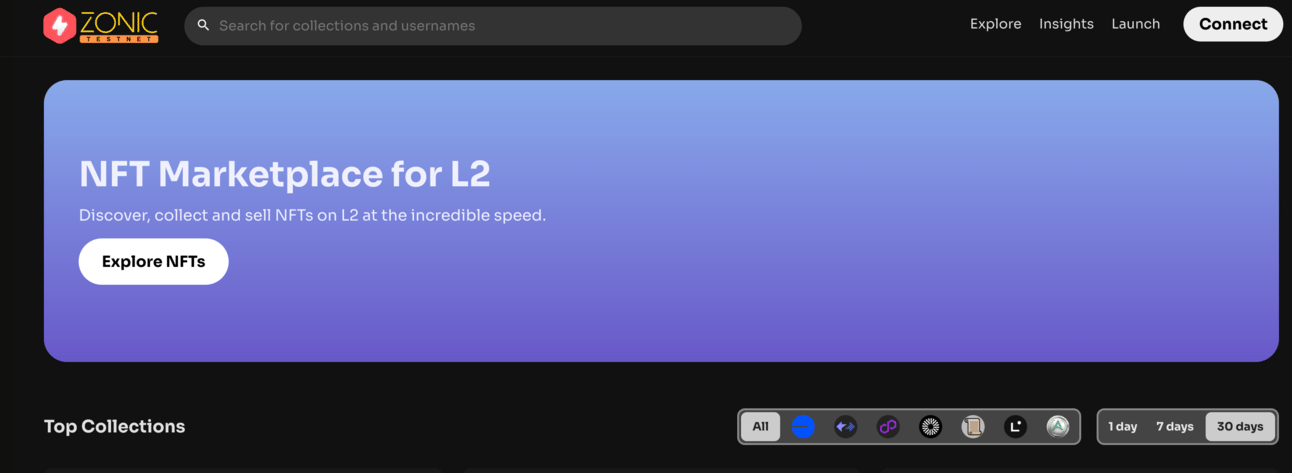
Click Connect top right
Choose MetaMask wallet
Click on the Mantle logo to the right of Top Collections
Review the NFT collections that show up and see if any have a floor price that is in line with the amount of MNT you have in your wallet
Click into a collection
Click into an NFT
Click Buy Now
Confirm transaction request in MetaMask pop up
Your NFT will arrive in your wallet shortly

List an NFT
Click Sell NFT
Input price you want to sell floor, e.g. the floor price
Choose Duration from dropdown options

Confirm transaction request in MetaMask pop up
Click Approve
Click down arrow in MetaMask pop up
Click Sign
You can cancel your listing or lower your price any time. Follow the screen and MetaMask prompts when you click either of these options.

Complete actions on Izumi Finance
You can review Izumi’s guide here: https://mirror.xyz/0x78c1675a2466430CB620F414910BFd6987676A8e/cV8TQSAUC-0HSdOeMVdctiLIs40SEG_Evb8M7Fmivtg
Swap MNT to USDT
Click Connect top right
Choose MetaMask wallet
Choose Swap from the top menu
Choose Swap tab
Choose MNT from the first token dropdown box
Note, it may show up as BIT token which was the token code they used in an earlier version of the testnet
Choose USDT from the second token dropdown box
Type in any amount of your balance of MNT in the input box (you will be able to see your available balance on the right)
Click Swap
Confirm transaction request in MetaMask pop up
Your USDT tokens should appear in MetaMask under Assets shortly

Place a Limit Order
Click Connect top right
Choose MetaMask wallet
Choose Swap from the top menu
Choose Limit Order tab
Choose MNT from the first token dropdown box
Note, it may show up as BIT token which was the token code they used in an earlier version of the testnet
Choose USDT from the second token dropdown box
Choose Market Price in USDT Price box
Type in any amount of MNT in the amount input box (we chose 1000)
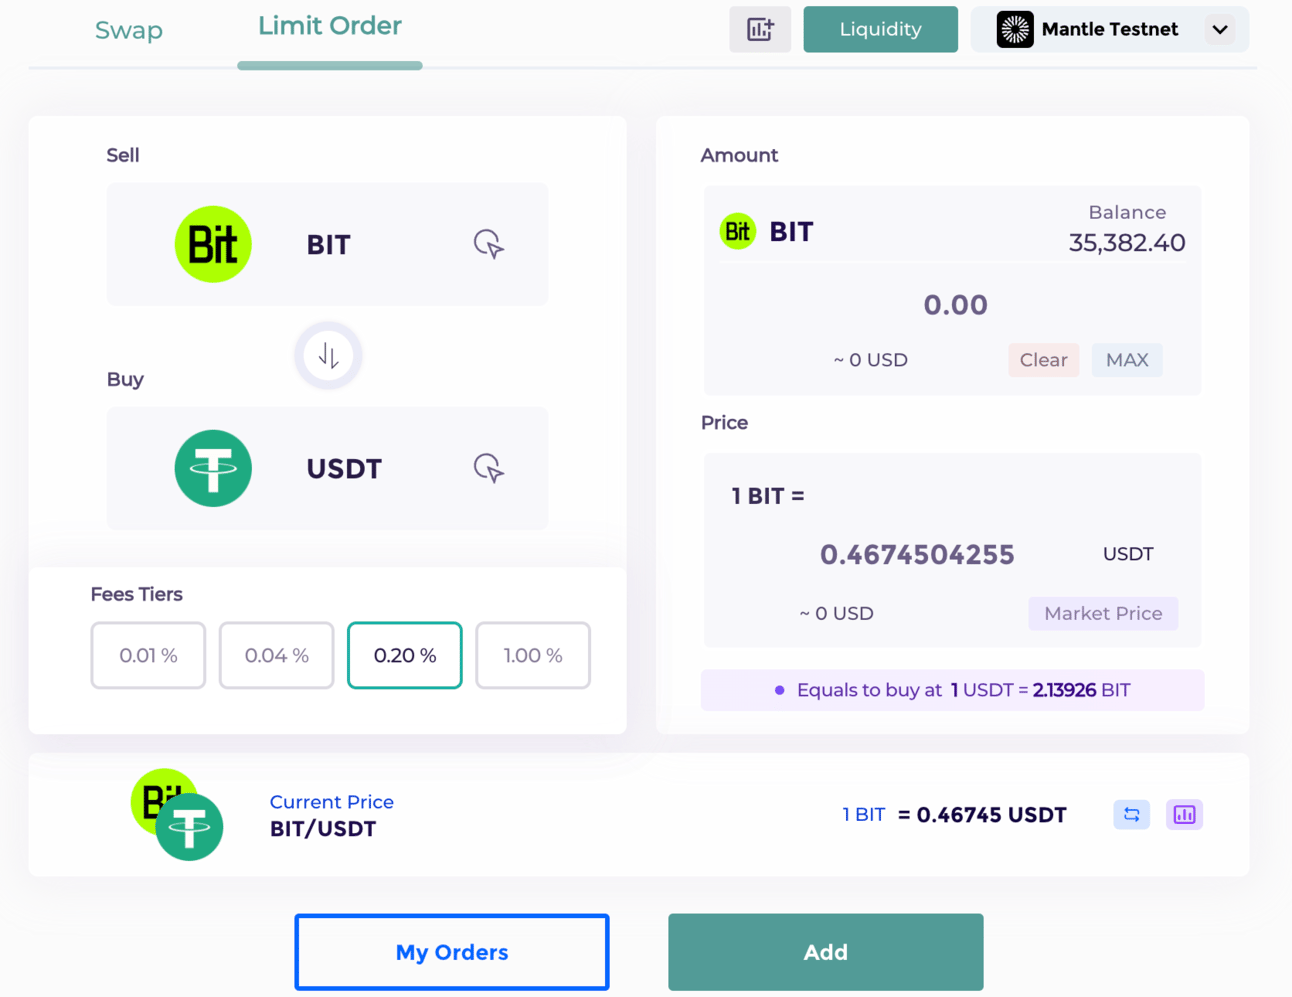
Click Add
Confirm transaction request in MetaMask pop up
Your limit order has been placed and will be fulfilled if the price criteria is met

Add Liquidity
Click Connect top right
Choose MetaMask wallet
Choose Liquidity from the top menu
Click Add Liquidity
Click Popular
Click Custom
Choose MNT from the first select token dropdown box
Note, it may show up as BIT token which was the token code they used in an earlier version of the testnet
Choose USDT from the second token dropdown box
Choose 0.20% fee tier
Input 0.46 in the USDT price box
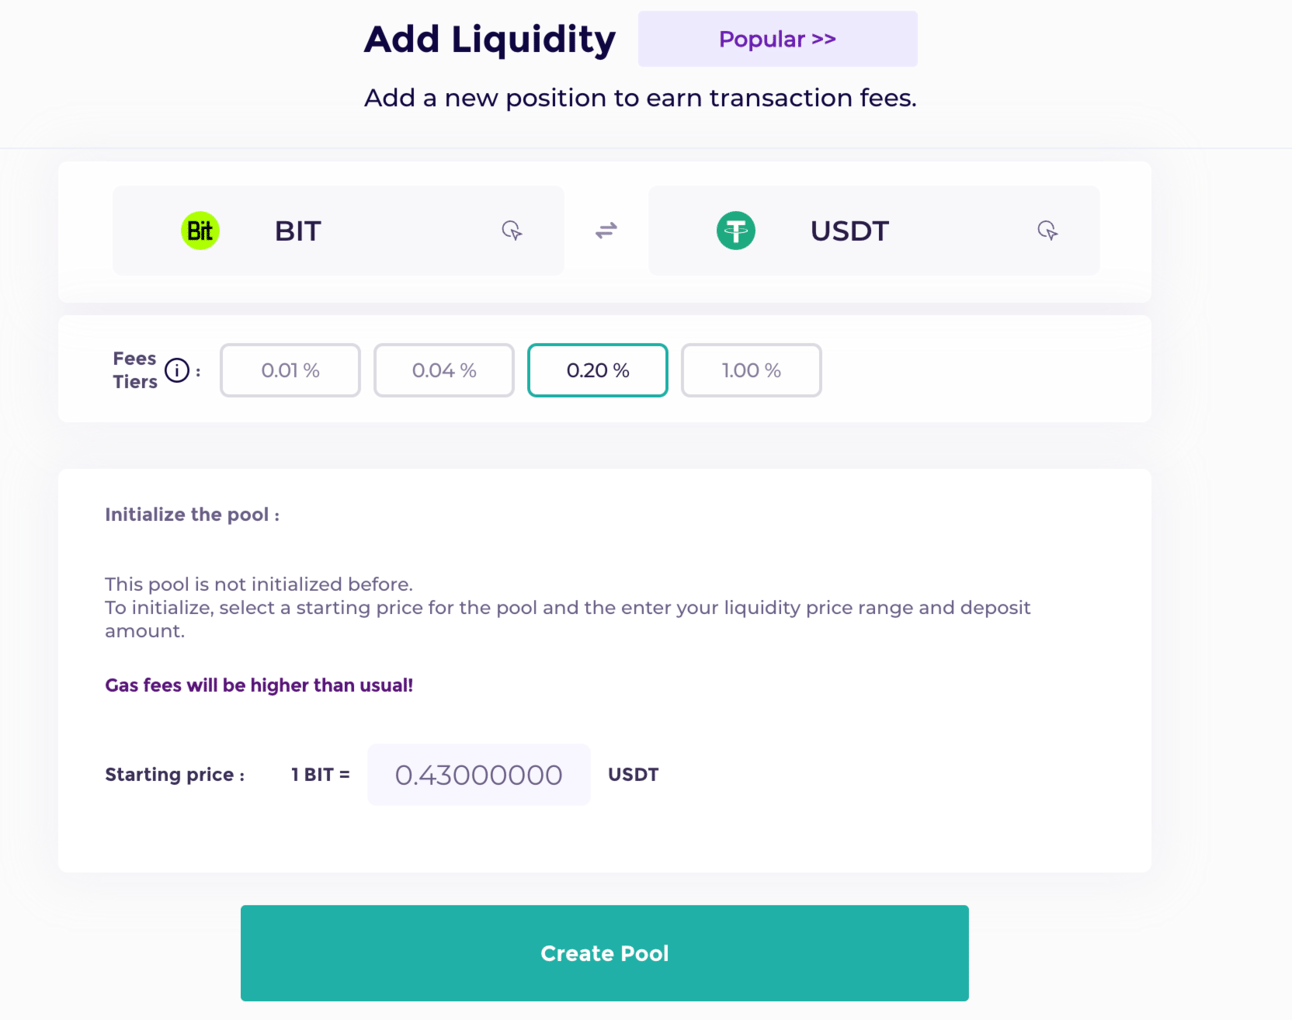
Click Create Pool
If an error shows, click Tap slider twice next to the Volume option
Click Max next to USDT amount
Click Approve USDT
Confirm transaction request in MetaMask pop up
In the MetaMask pop up click Max then Next
Approve transaction request in MetaMask pop up

Mint your OATs on Galxe:
Complete Twitter, Discord and Telegram tasks (follow, join and verify, join and verify)
Click Verify on each task to confirm eligibility.
You will need to wait for the Izumi tasks to be manually updated by them.
Bookmark the page and set a reminder to check back until it’s ready.
Once ready, click the Claim button
You will require some MATIC on Polygon to mint once you’re eligible to Claim your OAT NFTs
Approve transaction request in MetaMask pop up
Get BIT Delegate Role
You must hold at least 10 $BIT on your wallet in ETH Mainnet (see next section)
Delegate your $BIT to your ETH address on the website: https://delegatevote.mantle.xyz/
Click Connect Wallet
Click Send Message to verify your account
Click Sign In in MetaMask pop up
Navigate to the Delegate section on the page
Choose self delegate

Click Join
Choose MetaMask when connect wallet comes up (or the wallet option you use)
When a vote is available, participate in at least 1 vote
After fulfilling all of the above conditions, connect to https://guild.xyz/mantle to get a role (allow some time for this role to be applied in Discord)
This will also allow you to complete a quest on Zealy.

Purchase 10 BIT and add to your mainnet Wallet
This step is required to enable you to:
Complete a Zealy quest
Get BIT Holder Guild role for Discord (1 BIT required)
Get BIT Delegate Guild role for Discord (10 BIT required)
Vote in a BITDAO proposal regarding Mantle
WARNING. This step involves you spending your mainnet crypto. It is not a compulsory step so if you’re not comfortable with this and don’t care about roles or voting, you can skip this step.
Option 1 - purchase BIT from a CEX where it is available to buy on spot
A list of available markets can be found here: https://coinmarketcap.com/currencies/bitdao/markets/
Option 2 - swap some of your mainnet crypto to BIT by BITDAO
Use the MetaMask Swap feature
Wait until gwei is low
Open MetaMask extension and choose the Swap feature
Choose the token you will swap from, e.g. ETH
Enter token amount, e.g. 0.003
Choose the token you will swap to: BIT by BITDAO

Click review swap
Ensure you are receiving a minimum of 10 BIT
If you want to adjust it click Edit under the MetaMask logo on the pop up
Once you’re happy with the amount, click Swap
Your BIT tokens should appear in MetaMask under Assets shortly

Complete Quests on Zealy
Head to Zealy
Click Connect in the top right of the screen
You can choose to connect with your MetaMask wallet or your Discord account
If you choose Discord you will be taken to an authorisation page. Click authorise and the Zealy page will reload.
If you choose MetaMask you will need to approve the signature request to connect your wallet in MetaMask pop up
Once connected, you will need to join the Mantle Discord and verify before you can complete any quests
Once verified you can work through each quest by completing the step and then clicking Claim on each quest
It will verify you have completed the steps and award you experience points or submit to the team for review
Some quests are one offs, e.g. in the Getting Started section you need to follow their socials
Some quests are repeated daily or weekly
For help and support with quests you can ask questions in their Discord in the dedicated zeal-guild-support channel
Explore the Ecosystem
Head to https://www.mantle.xyz/ecosystem
Scroll down to the Explore all dApps section
Use the filters to find different type of dApp
Click on the link icon on any dApp you’re interested in to check it out
Some you can interact with, e.g. gaming and de-fi and some are more early stage for now
Congratulations! You’ve finished the guide and are one step closer to an airdrop! Keep your eye on the Discord and Zealy for updates on new quests, mainnet dates and more.
Please note that investing in crypto carries a high level of risk and is speculative in nature. The content of this article should not be considered as a recommendation from Droppables or the author to invest in crypto. Droppables does not provide any guarantees regarding the accuracy or timeliness of the information presented in this article. It is important to consult with a qualified professional who can assess your specific circumstances before making any financial decisions.